|
Bookmarks |
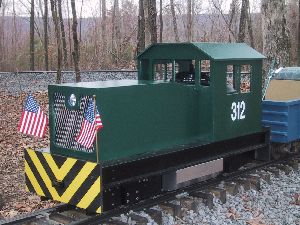
Building the Dakota and Williams 312 |
|
| History
|
This article was written with the thought that other model railroaders would benefit from seeing what can be constructed with a little bit of money and imagination. My desire to build a locomotive started shortly after joining the Chattanooga Society of Model Engineers. I joined in May 2002 after finding their web site. After working on their railroad, The Eagle Point Railroad (EPRR), for a few weekends, I built a gondola using some plans that I found on the Illinois Live Steamers web site. In July 2002, I brought my newly built gondola, still damp to the touch, to the summer run weekend. After being pulled behind other members locomotives, I developed the desire to look into building a locomotive. (I had yet to be able to run someone’s locomotive, but this was about to change.) My vast Internet based research showed me that there is three basic ways to build a model diesel locomotive. The first one I considered was using hydraulics powered by a gasoline engine. After studying this method, I was sure that I would use hydraulics to run the locomotive. I even had an old engine my parents had from an old 3.5 hp Briggs & Stratton Engine brought up from Florida with the thought that it would power the locomotive. Meanwhile, I had found the web site of 4QD and Lee’s Trains. Both of these sites showed me that I could use battery power and loose the noise associated with a gasoline engine. When I started adding up the costs of the controller, motor and batteries, I soon realized that the cost would be more than I wanted to spend. It didn’t take too much time before I realized that it might be easier to use the third method, a lawn transmission along with a vertical mounted engine. I started bidding on transmissions on eBay and thought I had won a few times before loosing in the final seconds. I had almost given up hope when a fellow CSME member, Chuck Priputin, saw a few of them on eBay. He bid on them and I had myself a transmission. It was time to locate the other parts. Now that I had the transmission, a Peerless Model XXX, I located a few engines on eBay, but the cost kept on running up over 75% of the new engine cost. That was my cost off point since I didn’t think the cost savings was worth the increased risk of a defective engine. While online, I located a few gasoline engine stores that had web sites. One of them, Small Engine Warehouse had a very long list of engines in all sizes and mounting configurations. I ended up purchasing a Honda GCV160 5.5 HP gas engine for about $150. This engine was larger than I wanted but it used OHV technology which should reduce noise and I figured that I could always run it at a slower idle to further reduce noise. The engine arrived in the mail in about a week and it was in excellent condition. I was worried that it may be factory seconds so I built a test stand to hold it while I started it. It ran fine.
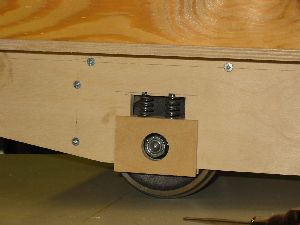
Now I had the main two parts so I needed to get wheels and the axles before I could start any construction. I had purchased a set of trucks from Mountain Car Company for the gondola I built in a few months before and I took them apart to see if I could use them. I found that the axles were exactly 1" in diameter and that the bearings would fit in a 1-1/8" bored hole. I tried to take off the wheels and bearings from the axles but found that the anaerobic sealant (maybe Loctite) was quite powerful and I would have damaged the parts getting them off. So I ordered two axles, four 4 1/8" wheels and four bearings. Mountain Car Company send them to me unassembled so that I could slide on sprockets.Trying to locate sprockets, pulleys and other parts at the local hardware store was quite difficult. I think I know every Ace Hardware store within 10 miles. I turned to Grainger and McMaster-Carr for the hard to find parts. Both of these companies have web sites and I managed to get a Grainger catalog from work. The Grainger catalog is over one thousand pages thick and quite educational. I ended up purchasing the sprockets and pulleys from the local Grainger store. Chuck Priputin, the fellow CSME member that had helped me secure a transmission already had a small locomotive that had axles fixed to the body. The axles were fairly close together so that any twisting of the rail would not derail it. I wanted to have a longer locomotive with longer spacing between axles, so I decided that axles would have a suspension consisting of four journal boxes that were supported by two springs each. It sounded simple but it would prove to be a problem in the end.
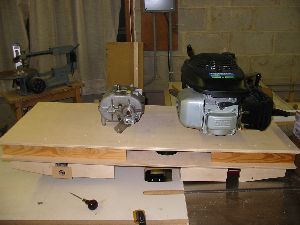
The locomotive needed to be able to fit it in the back of my Jeep Cherokee sideways so that I could utilize the back seat for my newborn son Sam, assuming that my wife and son would travel with me on run weekends. The Cherokee is about 42" wide inside so that would be the locomotive length after removing the couplers. My gondola would have to fit on the roof rack. This also would also prove difficult due to the weight of each. Eventually I would build a loading storage table that would allow me to roll them into the back of the Cherokee. My hobby has been woodworking for the last decade and I was determined to build a wooden locomotive even though everybody else had a steel locomotive. I had purchased a MIG welder for building the gondola frame but thought that this would be difficult for the locomotive due to the number of components and the difficulty of "just in time designing". Wood construction allowed be the greatest flexibility. The locomotive is constructed of two layers of plywood that are separated by about 2.5". In this space, a belt connects the engine and the transmission with 4L pulleys. A third wheel would be used that would add tension to the belt. It seems simple but remember unlike a lawn edger, the belt would have to be held in place when not under tension otherwise it would fall off the pulleys. One of the first problems that I solved was how to build the clutch. A wooden frame was built around the belt to keep it in contact with the transmission but would allow it to slip on the smaller engine pulley. The photo shows this. A spring keeps the clutch arm in the neutral position. And a lever in the rear allows me to engage it while sitting in the gondola.
The engine was placed 90 degrees off from its typical placement on a lawnmower. This allowed the engine to have its controls at the rear of the engines, which eliminates need for cables, and the exhaust at the front, which is connected to a copper pipe, and additional muffler that exits the front of the locomotive. Since the exhaust flows out the front of the locomotive, I breathe fewer fumes and hear less noise. Once the engine and transmission assembly was together it was time to place it on the axles. They had just arrived in the mail and I made two boxes to hold the axles. Each box would be placed on the frame with the chain in place so that it was tight before being fastened to the frame. The axles and journal boxes seemed to work and I even placed grease on the journal boxes to make sure that they did not bind. An ANSI #40 chain was run from the transmission to an intermediate ¾" shaft mounted on pillow blocks and then to each axle. This was done because I was worried about the upward force on the axle being off center and the springs allowing it to pull upward. The center shafts allowed the force to be horizontal which would not move the axle up or down. This also limited the chain length and therefore the droop toward the ties and rail. Or braking I utilized the brake on the transmission and this was connected to a lawn mower throttle cable to a throttle lever mounted on the clutch control bar on the rear of the locomotive. I did not know if the brake would work but it seemed that it should even though it is kind of small in diameter. The last part major system that was missing was the electrical system. I could have left this off, but I wanted a horn and headlight for night running. I was about to purchase a lawn and garden battery typically used in lawn mowers when my father told me about a battery that is meant to be kept in the trunk for jumping other cars. We went to Sears over Thanksgiving and I bought the smallest one that they had. It was perfect. It had weight, a small size, a built in charger and a cigarette lighter jack. This item saved me from having buy a charger. The battery plugs into an 120 volt extension cord for charging. I have yet to recharge it twice because the horn and light are not much load. I used a low tone horn from Pep Boys that only cost about $10. (Hopefully I will one day replace this with something more fitting.) The headlight was from Lowe’s and was intended for 12-volt interior lighting. It fits in the wooden body and it very bright. It lights up the garage at night quite well although I have yet to run at night. The upper body was made from 3/16" Russian birch plywood. This is great quality plywood that when finished had people touching it to determine if it was steel or not. The roof on the cab has a panel that comes out for refueling. Instead of using a hinge for the roof fuel panel I used two rare earth magnets from Radio Shack. The vibration from the engine does not shake it loose and the fit is so good that most people are surprised when I remove it. I was planning on taking the engine up to the EPRR the first week in December 2002. While loading up the vehicle on Friday night, I noticed that my radiator had a leak. What a disappointment! My Jeep Cherokee is the only family vehicle that it would fit in. I was forced to wait until the next weekend. When the next week arrived I was excited. The weather was fine for the trial run. I managed to go about 100 feet before it derailed. I had no idea what went wrong so I placed it on the rails and kept on going. After 500 feet I derailed again. I few of us looked at the track and noticed a low spot. We fixed it and ran back and forth. It all seemed fine. I kept on running but kept derailing. I managed to get it back to the loading dock by pushing it by hand. The journal box suspension was a failure. They did not flex as I thought probably due to friction. Everybody liked the ideas I had and had constructive criticism. They included moving the axles closer and making them fixed like other locomotives. My spirits were down as I drove away that night. I did manage to do a few things before returning to Atlanta. That day I removed the axles and fellow member, Larry Taylor, showed me how to use his milling machine. I added keyways to all of my axles and the center shafts so that the sprockets would not slip. Also, I noticed that the wheels had become loose on the axles because I did not use anaerobic sealant during assembly. I thought bolts would hold the wheels in place. That was easily fixed but once the anaerobic sealant is placed on there would be no turning back. The solution seemed to be a three-point suspension. The rear axle would be fixed in position under the engine and the front axle assembly would be able to pivot on a 3/8" shaft that ran parallel to the rails that was attached to the body. The locomotive would be able to stay on track that was ½" out of level on the front when compared to the rear. To keep the axle assembly from wobbling when being lifted, I placed springs on each side the assembly. This gives me a three-point suspension with front point distributing some weight through the springs.
When I brought the locomotive back up to the EPRR in February it ran well. I did not have one problem. I also added weight to the front since the locomotive is heaviest in the rear due to the engine placement. I built wooden boxes for the voids in the body and filled them with lead shot. The boxes were then filled up with epoxy so that the shot would not spill out onto. (Try vacuuming up lead shot. You can’t!) This gives me the ability to remove the lead boxes when moving the locomotive or disassembling it. I also added an emergency kill switch by attaching it to the low voltage side of the spark plug on the gasoline engine. If for any reason I need to stop the locomotive I can hit the button. Since these improvements I have only derailed once. This may have been to running to fast on a curved section of track with a slight twist. Of course I will never know the engines limits until I hit them. Just hope you are not on a bridge when you hit the limit. The project was quite a success. I have built a locomotive for about $500 that I can take to meets and pull my whole family. One day I will start a steam locomotive, but for now I am set. |